
2026-07-12
Mastering a soil conditioner attachment is a prerequisite for any operator tasked with professional-grade land reclamation or high-efficiency seedbed preparation. Often referred to as a power rake or Harley rake, this hydraulic tool provides immense power for grading, leveling, and pulverizing soil. However, its performance is dictated by the operator’s technique. For farmers and landscapers, precision in operating this equipment is the difference between a pristine finish and a messy, uneven job site. This guide provides the technical framework necessary to operate your skid steer or tractor attachment effectively.
A soil conditioner is a hydraulically powered attachment with a rotating drum. Its carbide‑tipped teeth reshape and prepare the ground surface. Unlike a bucket or blade, it spins to break clumps and clear debris. It levels the soil quickly and evenly in one pass.
The attachment connects to a skid steer or tractor coupler. It uses the machine’s auxiliary hydraulics to power the drum. The operator controls travel speed and working depth while conditioning the soil.
| Feature | Soil Conditioner (Power Rake) | Rotary Tiller |
| Primary Action | Skimming, grading, and separating debris | Deep digging and mixing |
| Depth | Shallow (0.5 to 2 inches) | Deep (4 to 8 inches) |
| Best For | Final finish, leveling, and removing rocks | Breaking virgin ground, mixing amendments |
Clear Statement: A soil conditioner is a finishing tool designed to grade and pulverize, not a deep-tillage tool for breaking bedrock.
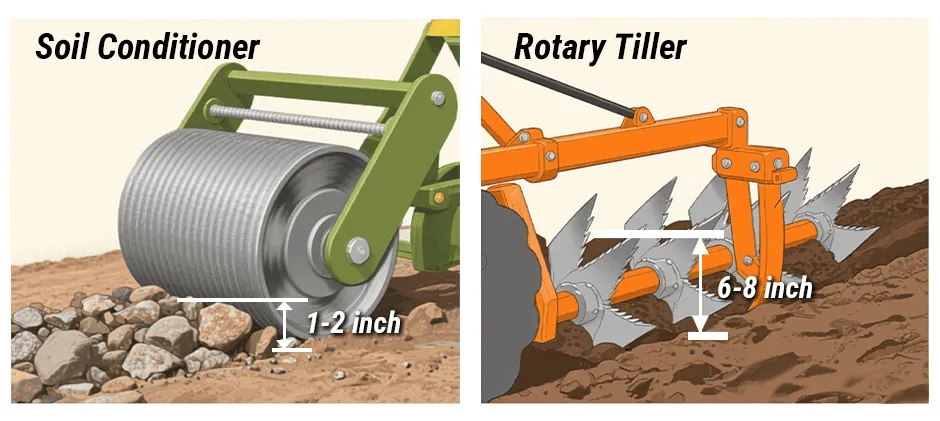
Deploying a soil conditioner is the most effective mechanical method for preparing a seedbed while simultaneously removing surface debris. Manual raking or using static drag mats cannot compete with the ability of a powered drum to pulverize hard-packed dirt clods into fine, usable soil. By adjusting the angle and depth, operators can reclaim gravel driveways, smooth out ruts from heavy trucks, and create a perfect substrate for sod or seed.
Operating a soil conditioner with a skid steer requires a disciplined, step-by-step approach to ensure the hydraulics and mechanical components work in harmony.
Verify that the attachment’s hydraulic hoses are free of leaks and that the coupler levers are fully engaged before starting the machine. Check the condition of the carbide teeth on the drum; missing or worn teeth will leave streaks in the soil and cause uneven vibration that damages the drum bearings.
Command the workspace by manually removing or using a grapple bucket to clear boulders, large stumps, or wire that could jam the rotating drum. While the conditioner can handle fist-sized rocks, large immovable objects can stall the hydraulic motor or snap the drive chain.
Lower the lift arms until the gauge wheels (or skids) touch the ground, setting the drum depth to lightly skim the surface (about 1 inch deep). If your goal is to windrow rocks to the side, hydraulically angle the attachment to the left or right; if you are simply leveling, keep the drum straight.
Activate the auxiliary hydraulics to spin the drum at full operating speed before making contact with the soil. For most applications, the drum should rotate in the opposite direction of the wheels (counter-rotating) to push debris forward while letting fine soil pass through the barrier.
Drive the skid steer in reverse while the drum spins forward to achieve the smoothest possible finish. This technique, known as “pulling,” allows the tracks or tires to travel on the smooth, finished grade rather than the rough, unprocessed ground, preventing tire ruts in your fresh work.
Engage the “float” function on your loader arms when working on uneven terrain to allow the attachment to follow the natural contours of the land.
This prevents the attachment from digging in too deeply on rises or bridging over low spots, ensuring a consistent grade across the entire site.
Understanding the wear parts of your soil conditioner is essential to prevent downtime and ensure the attachment lasts for years.
Achieving professional results with heavy machinery requires careful attention to the interplay between travel speed and drum speed. A common mistake is driving too fast; the drum needs time to process the material, so a slow travel speed combined with high drum RPM usually yields the best results. Additionally, avoid operating in mud. Wet soil will pack inside the drum housing (a condition called “blinding”), rendering the teeth useless and adding immense stress to the drive system.
“Quote: Let the machine do the work—forcing the drum into the ground will only stall the hydraulics and wear out your teeth faster.”
Successful land management is the result of combining technical operation with the highest quality equipment standards. By following a rigorous process of inspection, depth setting, and correct hydraulic operation, you ensure that your grading jobs are efficient and your equipment remains undamaged.
At MechLink, we recognize that your machine is the backbone of these tasks. Whether you need a replacement hydraulic motor or a new drive chain, we have you covered. Our “Fix it once, fix it right” philosophy ensures you have the reliable parts you need to perform day after day.

Ultimate guide to choosing the best engine oil filter for tractor
2026-09-20
How much does a ford f-150 weigh? 2026 complete guide
2026-09-20
Do diesel engines have spark plugs?
2026-09-19
How to choose the right connecting rod bearing?
2026-09-19