2026-08-01
This guide shows how to clean a spark plug safely and correctly. If your off-road machine starts hard, idles rough, or loses power, a dirty plug is a common cause—especially after dusty work, mud, or lots of short trips. Cleaning is a quick field fix and a good test, but it won’t cure worn engine parts. Follow the steps below to clean, inspect, gap, and reinstall the plug the right way.
This applies to gasoline (and some LPG/propane) engines that use spark plugs. Many heavy off-road machines are diesel and use glow plugs instead, so check your engine type first.
Look for a thick spark plug wire or a coil-on-plug cap on the cylinder head. If you see that, you’re in the right place.
Spark plugs get dirty when fuel, oil, or dust leaves deposits on the tip. Those deposits can weaken or “short” the spark, causing the engine to misfire.
Carbon buildup is the most common type you can clean. It usually looks dry, black, and sooty.
Oil fouling is a sign of a bigger problem. It often appears wet, shiny, and black, and it can reappear quickly after cleaning.
Clean the plug when it is dirty but not damaged. Cleaning works best on dry soot and light deposits.
Replace the plug when you see damage or heavy fouling. Use this simple checklist:
If you determine that replacement is the best path forward, it’s helpful to understand the potential spark plug replacement cost to make an informed decision.
Clear rule: “Dry soot can be cleaned; wet oil usually needs a new plug.”
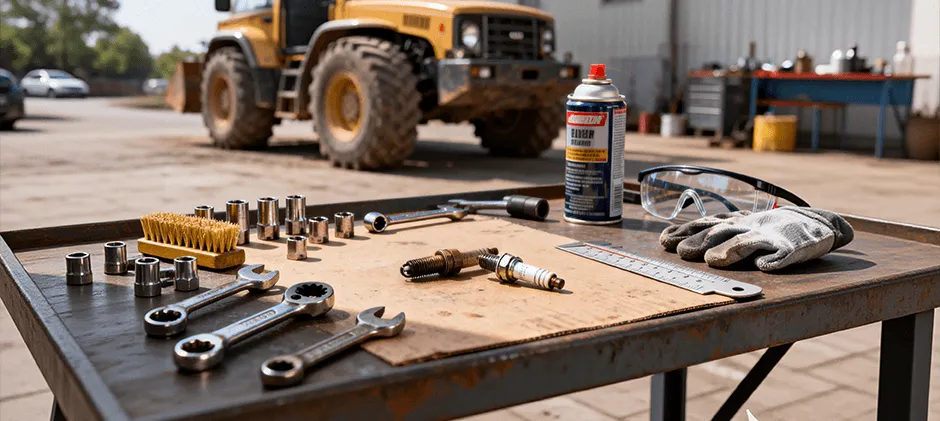
You only need a few basic tools to do this safely. Bring these items to the machine:
Work on a cool engine to avoid burns and thread damage. Hot aluminum heads can strip more easily.
Disconnect the negative battery terminal if you might touch the wiring. This reduces the risk of shocks and accidental cranking.
Clean around the plug before removal. Dirt falling into the cylinder can score the walls and damage the engine.
Blow debris away before you loosen anything. Use compressed air or a brush to clean the area around the plug. Pull the boot by the boot, not the wire. Twist gently to break the seal, then pull straight off. Remove one plug at a time. This prevents mixing up wires or coil locations.
Read the tip first because it shows the engine’s condition. Check the firing end (electrodes and ceramic nose) for color and texture. Stop and replace if you see cracks or missing metal. A damaged insulator or worn electrode won’t become “good” again.
Spray cleaner to soften the carbon before brushing. Brake cleaner or carb cleaner works well for dry soot. Let it sit for a short moment. A quick soak helps deposits lift off instead of smearing.
Brush the electrodes and tip until the metal edges look clean. Use a brass wire brush and steady pressure. Avoid aggressive grinding on the ceramic. Scratching the insulator can make it hold dirt more easily later. Use sandpaper only as a light touch option. If you must, use fine 220-grit gently on stubborn carbon on metal—don’t reshape the electrode.
Clean the threads so the plug seats correctly. Brush the threads and wipe away loosened grit. Do not leave loose debris on the plug. Any grit can fall into the cylinder during reinstall.
Dry the plug completely before reinstalling. Blow it off with compressed air and let the solvent evaporate. Recheck for cracks and heavy deposits after cleaning. If it still looks questionable, replace it.
Set the gap to the engine manual spec because the gap, along with factors like the spark plug heat range, controls spark strength. Use a gap tool to measure and adjust carefully. Thread the plug in by hand first to avoid cross-threading. If it doesn’t turn easily, stop and realign. Tighten to spec if you have torque values. A torque wrench helps avoid stripped threads or a loose plug.
Clear statement: “Hand-thread first, then torque—never force it.”
A plug can fail internally even if it looks fine. The internal resistor or core can open up and cause a weak or missing spark.
Swap in a known-good plug to test quickly. This is often the fastest field diagnosis. You can also learn how to test a spark plug with a multimeter to be certain.
Check the boot, wire, and coil if the problem stays. Cracks, moisture, and corrosion can also cause misfires.
Small habits can reduce fouling and extend plug life.
Cleaning is a smart, quick way to restore performance when the plug has dry carbon buildup. Inspect first, clean gently, dry completely, set the correct gap, and reinstall carefully to avoid thread damage. If the plug is oily, cracked, or badly worn—or if cleaning doesn’t help—replacement is the safer fix. Browse MechLink for a reliable replacement spark plug and get your machine back to strong starts and steady power.