2026-07-22
When the snow starts falling, there’s no time for guesswork. Starting a snow blower follows the same simple routine every time: check → prime → choke → start → warm up.
This guide is for off‑road equipment owners who rely on their machines to clear driveways, gravel lots, access roads, and job sites. The steps apply to both single‑stage and two‑ or three‑stage snow blowers, helping you get dependable starts in any winter condition.
Low oil can ruin an engine fast.
If it’s low, add the correct oil type from your owner’s manual.
Old gas can make starting hard. Gas can go bad in about a month, especially if it has ethanol. Signs of a bad fuel filter or clogged lines often mimic bad gas issues.
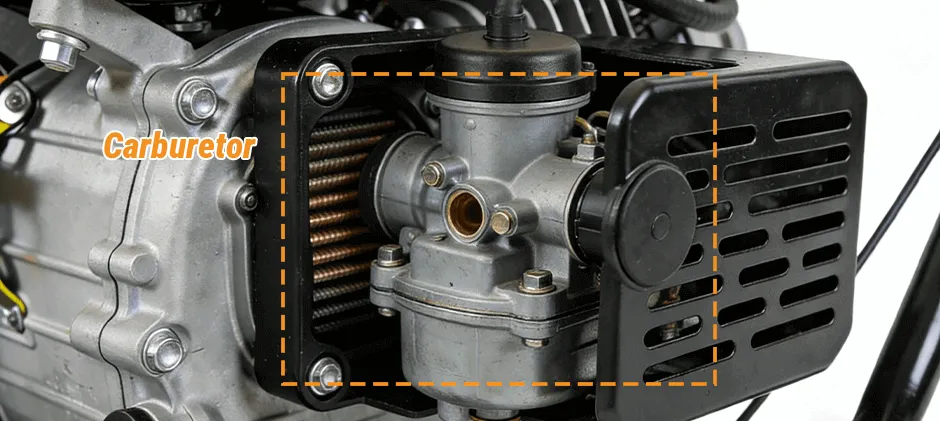
Most machines have a small valve inline with the fuel hose. Turn the lever so it is parallel to the fuel line (the ON position). If this valve is closed, fuel cannot reach the carburetor, and the engine will not start.
Before starting, make sure the auger area is clear.
Always keep your hands away from the auger housing. Use a clean-out tool if you have one.
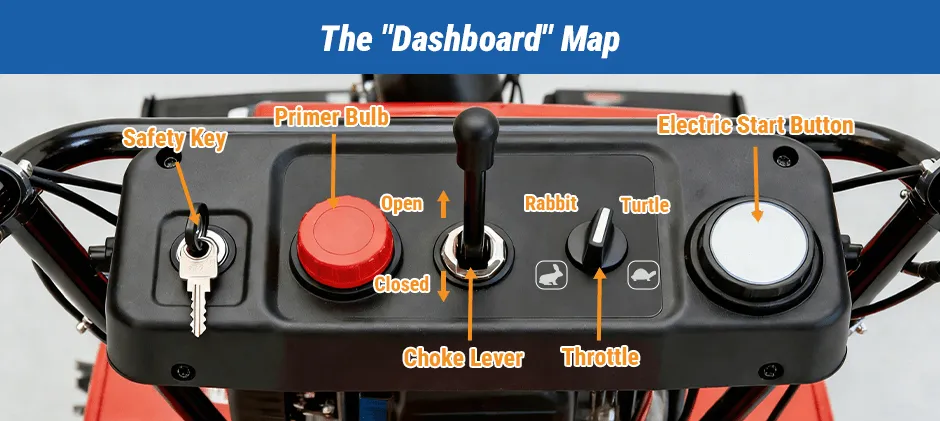
Most snow blowers won’t start without the plastic safety key. If you are experiencing ignition switch problems, ensure the key housing is clean and undamaged.
(Also check the engine switch is set to ON, if your model has one.)
Many snow blowers use a 120V plug-in starter.
Use an outdoor-rated extension cord in good condition.
Even with an electric starter, the engine needs full throttle to ignite and run properly. Ensure the lever is set to the highest speed.
Press the primer bulb 3 to 5 times.
This sends a small amount of fuel into the carburetor to help with cold starting.
If it’s very cold, you may need one or two extra presses. Don’t go crazy—too much can flood the engine.
A cold engine needs less air and more fuel to start.
Hold the electric start button for no more than 5 seconds at a time. Once the engine starts, unplug the cord from the wall outlet first, then from the machine to prevent the live cord from dropping into the snow. As the engine warms up, slowly move the choke toward RUN / OPEN.
Pro Tip: “Never crank the electric starter for more than 5 seconds. If it doesn’t start, wait 10 seconds to let the starter motor cool down to prevent overheating.”
Many engines start best at FAST.
Put choke on FULL for cold starts.
Press the primer 3 times.
Pull slowly until you feel it “catch.” This gets the engine in a good spot to start.
Pull hard and smooth.
After it starts, the engine may run rough at first.
Yes, mostly in where the controls are and how they are labeled.
The core mechanics of internal combustion are universal, but control layouts vary.
For example:
If you can’t find a control, check the label near the handlebars or dashboard.
Small engine manufacturers supply most brands.
Many machines use engines from Briggs & Stratton, LCT, or Honda. The parts may look different, but the order is usually the same:
Prime → Choke → Start (button or pull) → Open choke slowly
This is one of the most common issues after long storage.
Old fuel can turn into a sticky varnish that clogs small fuel passages inside the carburetor.
When that happens, the engine might crank but not fire — or start briefly and then stall.
Make sure the spark plug wire is firmly attached.
If the engine still won’t start, remove the plug and inspect it:
Some snow blowers have a small valve near the fuel line that controls flow.
Make sure it’s in the ON position — usually when the lever is parallel to the fuel line.
As long as you master the proper method and know how to use a snow blower safely, starting your machine can be a repeatable routine.
If your machine struggles to start despite following these steps, you may need to replace the carburetor, spark plug, or ignition coil. MechLink offers a wide selection of high-quality, aftermarket snow blower parts compatible with major brands to keep your equipment running at peak performance all winter long.