Clean diesel injectors are the key to a diesel engine’s power, fuel efficiency and smooth running. An injector turns diesel into a fine mist and sprays it into the engine, so the fuel burns fully. The injectors is getting dirty over time. A little fuel is often left in the injector nozzles after the engine is turned off. This fuel slowly forms carbon deposits and gunk under high heat, clogging the injector holes. Uneven fuel spray, poor atomization, lost engine power, and higher fuel consumption—these issues can all be caused by dirty injectors. This guide will walk you step by step through how to clean diesel injectors.
What Diesel Fuel Injectors Do in an Engine?
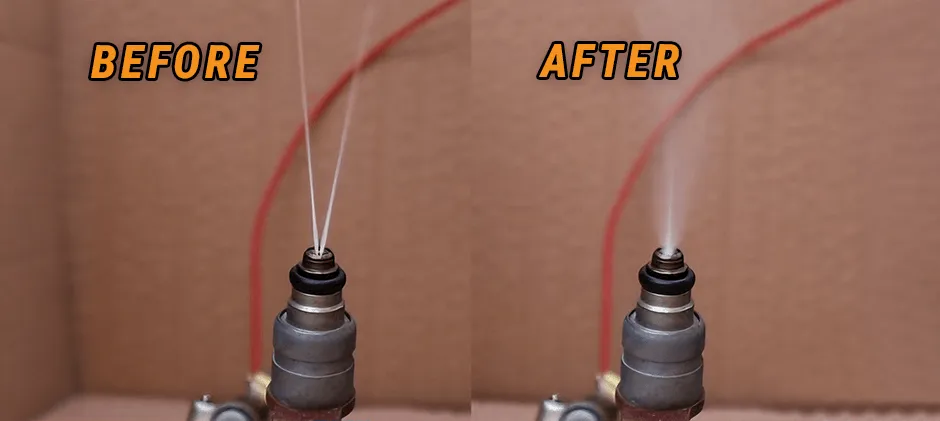
The diesel injector beats the diesel into a fine mist under high pressure and sprays it directly into the combustion chamber. It’s not just about feeding fuel into the cylinder; it’s about making the diesel burn clean and powerful.
Spray fine enough for diesel to mix thoroughly with air. More complete combustion and more stable power. If the oil is not injected smoothly and atomized well, the diesel will drip in like water instead of forming a mist. This situation will make the combustion efficiency worse. Not only will it be fuel-intensive and boring, but it will also make the engine more laborious, and the work will naturally slow down.
Why Diesel Injectors Get Dirty?
Heavy-duty diesel engines work in really tough conditions—very hot and under extreme pressure. Over time, the intense heat bakes any unburnt diesel onto the injectors. This builds up into hard, sticky carbon deposits and sludge.
For off-road machines like excavators, certain common work habits make this problem worse. Idling for long periods. Frequent starting and stopping. Running under light loads for an extended time. These keep the engine from reaching full operating temperature. So the carbon never burns off, just keeps piling up. Eventually, it clogs the tiny holes in the injectors. That ruins the spray pattern and restricts fuel flow.
How to Clean Diesel Fuel Injectors?
There are two main ways to clean injectors: Use a fuel additive for regular upkeep, and do a full deep clean off the engine for bad clogs. Additives work great for prevention. But this guide is for when your engine’s performance has already dropped. We’ll focus on the complete cleaning method. You can do this detailed, hands-on cleaning yourself. But you’ll need patience, a clean workspace, and the right tools. Notice: Never swap parts between different injectors. The internal parts are precisely matched for each one.
Removal & Prep
First, clean the area around the injectors on the engine top thoroughly. Don’t let dirt or debris fall into the combustion chamber.
- Disconnect lines: Gently pull off the small rubber return lines from the barbs. Use a 14mm wrench (standard size) to disconnect the metal hard fuel line from the injector— a crowfoot adapter helps avoid stripping the nut. Tie the hard line out of the way gently.
- Remove the injector: Loosen it with a deep 6-point 27mm or 1-1/16 inch socket. Critical: Don’t put a wrench on the flat parts of the injector body (it could split the two halves). Make sure the socket clears the return line barbs. Once loose, unscrew the injector easily by hand.
- Secure the engine: Fish out the old heat shield (crush washer) from the hole with a pick or magnet—you’ll need a new one for each injector when reinstalling. Stuff a clean, lint-free rag into the injector hole to keep it clean.
Disassembly
- Secure the injector: Clamp it upside down in a bench vise. Use soft jaws or wrap the injector in sheet metal to avoid damaging the body.
- Separate the halves: The two parts are tight—loosen and pull them apart with the same 27mm/1-1/16 inch socket. Hold the injector flat over a clean tray/towel while unscrewing to catch small internal parts (they won’t pop out, but better safe than sorry).
- Lay out parts: The injector has small precision parts—nozzle, needle, intermediate disk, pressure pin, spring, shim. Lay them out in order on a clean, lint-free cloth. The shim (it sets the injector’s pop pressure) may stick inside the upper body—check for it.
Clean the Components
An ultrasonic cleaner is the best option—it uses high-frequency vibrations to get rid of tough gunk in every tiny crevice.
- Solvent bath: Put all metal parts in a beaker/glass jar with solvent (acetone or carburetor cleaner works). Wear chemical-resistant gloves and eye protection.
- Ultrasonic clean: Submerge the beaker in the ultrasonic cleaner (filled with water) and run it for 20-30 minutes— the vibrations do the hard work.
No ultrasonic cleaner? Soak the parts in a covered solvent container overnight. Set the container in a pan of hot water to speed up the process.
Lap for a Perfect Seal
Lap the metal sealing surfaces for a professional finish—these surfaces hold extreme pressure, and any small flaw causes leaks.
- Find the key surfaces: Top of the nozzle, both sides of the intermediate disk, the flat spot on the upper injector body where the disk sits (four total).
- Lapping process: Tape a small piece of 2000-grit wet/dry sandpaper to a perfectly flat surface (like plate glass). Add a drop of diesel fuel as lubricant, then rub each sealing surface in a circle until it’s clean and shiny all over.
Final Clean for Needle & Nozzle
- Gently scrub the needle tip and injector nozzle outside with a soft brass wire brush. Scrape off leftover carbon with a new razor blade—don’t scratch the metal.
- Wipe the nozzle inside with a cotton swab and alcohol.
- Do the gravity test: Dip the clean needle in filtered diesel fuel, slide it into the nozzle. Lift the needle a few millimeters and let go— it should slide back down smoothly on its own. If it sticks, clean the parts again.
Reassembly & Installation
- Assemble the injector: Put the clean, dry parts back together in reverse order of taking them apart. Make sure the pressure pin sits right on the spring end. Hand-tighten the two halves— check the threads engage smoothly, no jams.
- Torque to spec: Clamp the injector back in the vise, then tighten it with a torque wrench. Typical spec is 70-80 Nm (55 ft-lbs), but always check your machine’s service manual for the exact number (it can vary).
- Install in the engine: Drop a new heat shield into the prechamber hole. Screw the reassembled injector in and torque it to the manufacturer’s spec. Reconnect the hard fuel line and rubber return lines.
- Final check: Start the engine— it may crank a little longer to clear air out of the lines. Once it’s running, check carefully for fuel leaks around the lines and injector body.
Signs of Diesel Fuel Injectors Need Cleaning
Your machine will clearly let you know when the injectors are having trouble. Ignore these signs, and you’ll end up with worse engine damage.
- Lack of power & slow response: Your excavator feels weak when digging or lifting. The engine doesn’t pick up speed fast when you put it under load.
- More fuel use: You’re refueling more often, even with the same amount of work. Clogged injectors are almost always the reason for wasted fuel.
- Black or white exhaust smoke: Too much black smoke means fuel isn’t burning all the way. White smoke usually means one or more cylinders aren’t firing right—thanks to a blocked injector.
- Rough idle & engine knocking: The engine shakes, sputters or knocks, especially when it’s idling or running at low RPM. This is almost always from uneven fuel spray due to dirty injectors.
- Hard to start: Dirty injectors can’t spray the fine fuel mist needed for quick ignition. The engine will be tough to start, and it’s even worse in cold weather.
How Often Should Diesel Fuel Injectors Be Cleaned?
As a general rule, deep clean your diesel injectors every 1,500 to 2,000 operating hours. But adjust this timing based on how your machine is used. Tough working conditions: If your equipment idles for hours, works in super dusty areas, or does light jobs often, clean sooner. Aim for every 1,000 hours. If the machine runs under heavy load most of the time, it stays at the right operating temperature. The heat burns off deposits, so you can wait longer between cleanings.
When to Clean vs Replace Diesel Injectors?
Whether to clean or replace your injectors just boils down to weighing cost and condition.
Clean them if:
- You catch the problem early, with mild symptoms (like a little lost power or slight smoke).
- No physical damage to the injector—most performance issues are just from carbon buildup.
- You’re doing regular preventative maintenance on schedule.
Replace them if:
- The injector is damaged (cracked body, worn nozzle tip, you can see).
- Professional cleaning and testing don’t fix the spray pattern or pop pressure.
- Internal parts are too worn to repair. If the needle still fails the gravity test after a thorough clean, it’s worn out—replace the whole injector.
- You find metal shavings in the fuel system—this is a serious issue, and cleaning won’t fix it.
Preventing Diesel Fuel Injector Problems
- Use good-quality diesel: Buy fuel from trusted suppliers with high turnover to avoid dirty/contaminated fuel.
- Change fuel filters on schedule: Replace primary and secondary filters as the manufacturer recommends—they’re the engine’s first defense against gunk.
- Drain the water separator regularly: Keep water out of the fuel system, or it’ll corrode and damage injector parts.
- Run the machine properly: Don’t idle for too long when it’s not needed. Work your excavator/loader with a steady load—this gets the engine hot enough to burn off carbon buildup, keeping the whole system cleaner for longer.
Final Thoughts
Clean diesel injectors are key to your engine’s power, fuel efficiency and long life. Whether you clean them yourself, use fuel additives, or get a pro to do it, regular injector maintenance saves you money and cuts down on breakdowns. If your injectors are too worn out and need replacing, MechLink has reliable, trusted replacement parts to get your machine back up and running fast. Shop now!